
When you get Starlink you may be faced with a new problem, the WiFi is slow in some parts of your house (as opposed to the whole house!)
Adding a mesh network can fix a few problems:
- increase WiFi speeds in the areas distant from the Starlink router
- allow seamless switching between WiFi access points
- more reliable connectivity
- you can wander around the house using Wifi Calling
- one WifI name that covers the whole house
This is a brief review of the mesh system that we purchased for Starlink. (Note that if you have a rectangular Starlink dish you can purchase an official Starlink Mesh Unit for NZ$265.)
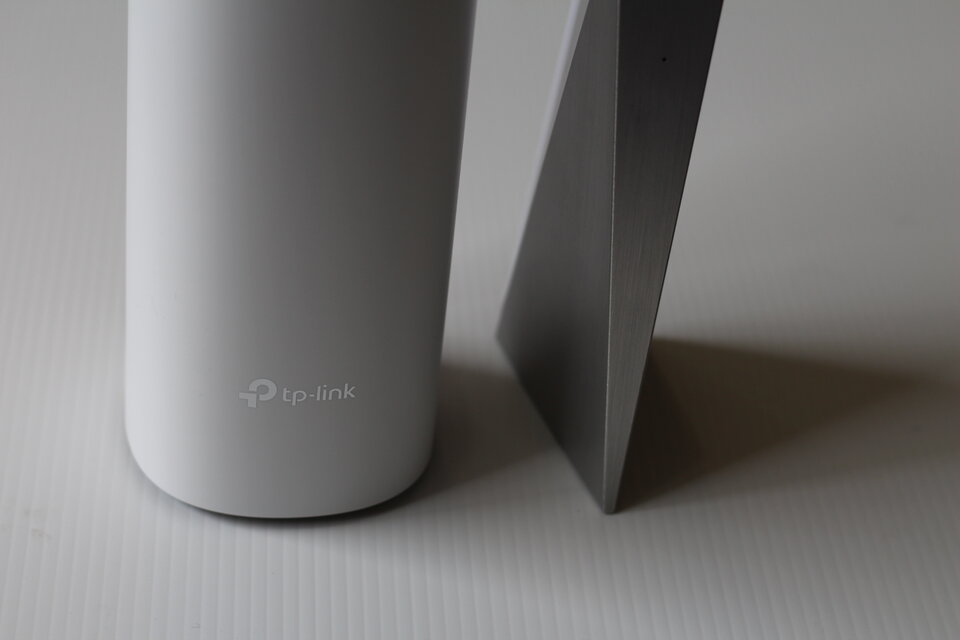
The unit chosen was a “TP-Link Deco M4”. They are widely available, often at discount prices. A pair of these mesh units was NZ$173 on sale (shop around at Noel Leemings, Harvey Norman, and PB Tech. The best price I’ve seen in 2024 is Amazon Australia).
November 2023 Update– The “TP-Link Deco S7” has become more commonly available, and has better performance than the M4 model. The “TP-Link Deco “X20” has even better performance if you have a very large house.
If you have an old rectangular dish, you will also need to buy a Starlink Ethernet Adaptor.
You can still use a 3rd party mesh but you will need to purchase an “Ethernet Adapter” from Starlink. This is required to connect the mesh to the Starlink router.
Another option is to purchase an official Starlink mesh node. (This option is not currently available for those with a round dishy).
The Starlink mesh looks to be super simple to install. However it may not have all the features of a 3rd party mesh just yet. (Eg Qos, parental controls, wired backhaul)
How to hook it up
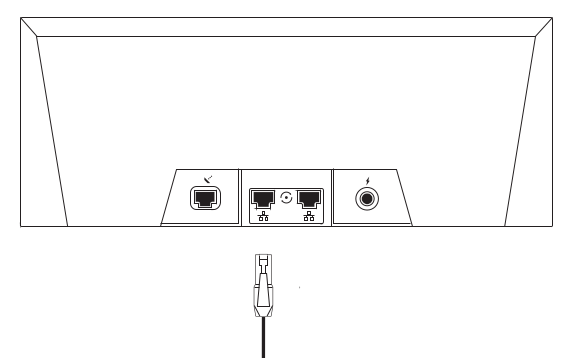
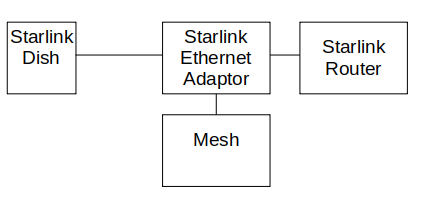
Connect one of the mesh units to either:
- the Starlink Router (round dish or current rectangular dish only) or,
- the Starlink Ethernet Adaptor (old rectangular dish only, purchased separately from starlink.com or Noel Leemings)
Place the second mesh unit within WiFi range of the first unit. Optionally the mesh units can be connected via an Ethernet cable (not supplied) for optimal performance.
New Dish (April 2024):
Round Dish:

Old Rectangular Dish:

How to Configure it
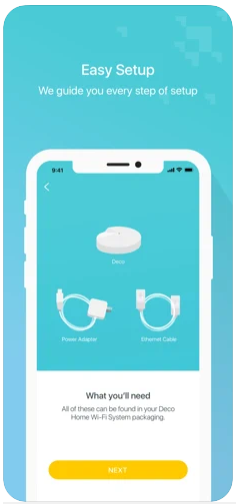
There is a phone app that leads you through every step. No need to read a manual. The configuration went very smoothly. Its not often that I’ve said that.
Here is a video of how its done
Starlink Bypass Mode
For best performance, the Starlink router can be put in Bypass mode, OR the mesh can be put in Access Point mode.
I prefer the later because:
- it allows the Starlink app to talk to the dish locally without additional configuration (eg static routes)
- troubleshooting is easier for Starlink support
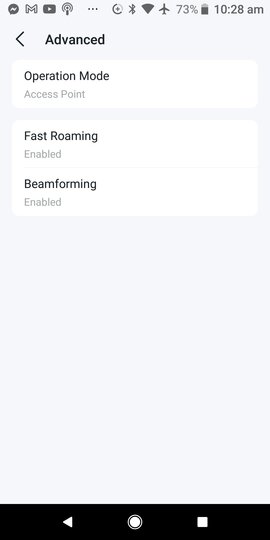
The Deco can be put in Access Point Operational Mode from the Deco app. Tap the More button (bottom right) then tap Advanced. Change Operational Mode to “Access Point“.
To avoid accidentally connecting to the Starlink router, you can “forget” the router’s WiFi on your devices.
Bypass mode will completely disable the built-in Starlink WiFi router functionality.
Be patient, it may take a few minutes for Starlink to recognise a new 3rd party router or mesh.
For the Starlink app to work locally, your 3rd party router or mesh needs to be able to send to the dish (192.168.100.1). Some routers/mesh are not capable of this. Others require a static route (route 192.168.100.1/32 via the WAN port). Some other pick this route up automatically from DHCP.
(If your dish is operational, then the app can connect externally via the internet. However if the dish is disconnected from the internet, connecting locally is the only option for troubleshooting.)
Factory reset the Starlink WiFi router to disable bypass mode.
Conclusion
I’m happy with the purchase…no buyers remorse.
- Easy set-up using phone app
- Good performance with Starlink
- Good price
- 3 year warranty (is it just me, or do other people find WiFi devices die to often?)
- Low power consumption and doesn't get hot
- Few configuration options
- Possibly too slow if you have Gigabit fibre
- Not as fast as a tri-band mesh unless you cable with Ethernet (details in the test section)
Important- a Starlink Ethernet Adaptor must be purchased separately for the rectangular dish.
You may have noticed that I haven’t detailed the performance of the Deco M4. Probably not of interest to some people , but I’ve included it as a foot note.
Test results and methodology
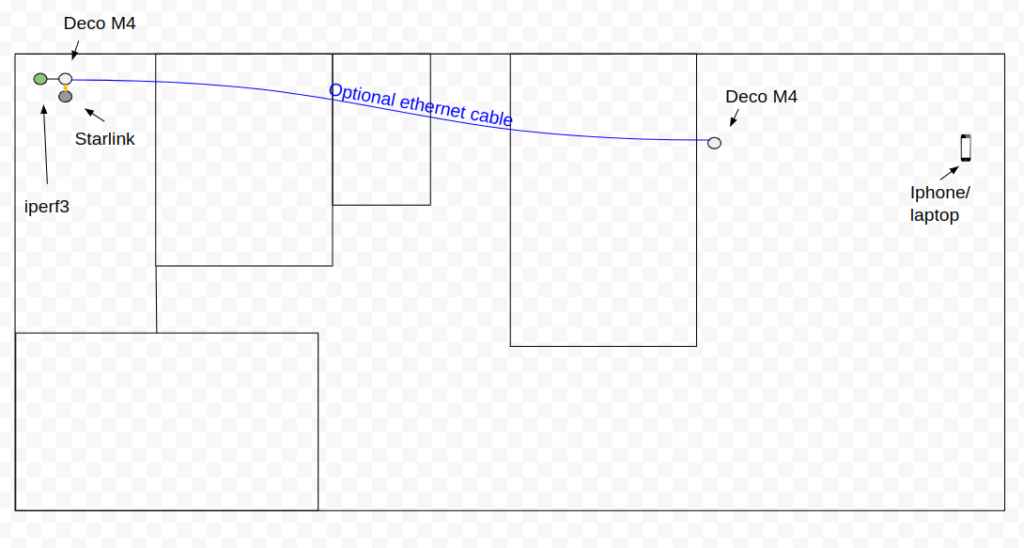
Because the mesh system was often faster than Starlink, ordinary internet speed tests would be ineffective. Instead I used a local server running iperf3. This server was connected the Gen1 Starlink router via Ethernet cable.
At the opposite end of the house where situated a laptop and an iphone . As a baseline, iperf3 speed tests were made to these devices to the Starlink router wifi.
Then the same tests were performed using the mesh. A further test was made with the Mesh units connected with Ethernet.
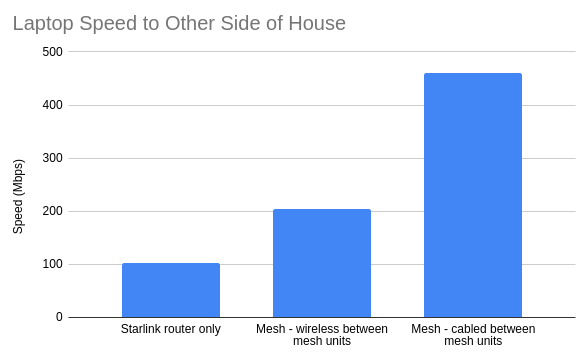
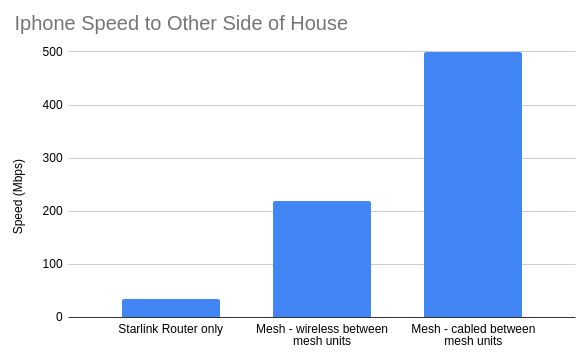
The Deco M4 is only “dual band”, so cabling the units together can make a big difference. However I suspect that most people may not notice the increased performance.
Need more performance?
A few closing comments on how to get the most from a mesh system:
- Reposition the mesh units
- Connect the mesh units with Ethernet cabling
- Connect smart TVs via Ethernet to router or mesh unit
- Add more mesh units
- Get a “tri-band” mesh system. More bandwidth is freed up with dedicated wireless links between units. However they are typically twice the price of the Deco M4.
- For extending to garages or sheds etc see Extending Starlink to Other Buildings .
Is anyone able to adivse if you can just plug in a Storlink modem into a router configured for VLan10 input?
I want to use my own routers etc and just want the strlink to provide an internet connection only.
What Range did the TP-Link Deco M4 provide? I am trying to extend the range to a sleepout.
The furthest I tried it was in another building around 15m from the house. It was much slower at that range, but good enough for HD Netflix. Reliability may be an issue at that range (I didn’t do much testing).
It all depends on a number of factors: distance between mesh units, the wall construction, and your speed expectations. You may be happy with the performance of the mesh units just connected wirelessly.
If you need to improve performance then running an ethernet cable out to the mesh unit sleep out would be the 1st choice to checkout. In some situations it may be relatively easy to run some weatherproof Ethernet cable in some conduit and bury it 5-10cm.
A more technically complex solution would be to connect the mesh units with a wireless bridge. Something like a pair of Ubiquiti NanoStation 5AC bridge units. If you don’t want to get involved, then someone like a security camera installer could help
The most recent Starlink router (with the new rectangular dish) does not have any ethernet port, so connecting a mesh via cable is not an option. Do you know the starlink router works with fully wireless mesh extender such as the Netgear Night Hawk EAX20?
Unfortunately you have to pay extra to get an Ethernet port with the rectangular dish. Starlink charge NZ$65 for the “Ethernet Adaptor”. Alternatively, there is the Starlink Mesh unit NZ$265.
What should I use to get good internet in Bach from house
It really depends on how far the bach is from the house. If its only 10m, then mesh units in the house and bach may be sufficient. Other options are:
-running an (outdoor rated) Ethernet cable between buildings
-installing a point to point radio system between buildings (assuming that there is line of sight between buildings)
-running a fibre between buildings
A security camera installer could probably help with the last two options, but the costs may be significant.
I can give a more detailed response if you send an email with some specifics eg distances, obstructions between buildings, speed expectations
Hi and thank you for your time! Is it possible to connect the Starlink Ethernet Adaptor (rectangular dish) to a switch and from this switch connect via ethernet all satellites (AP mode)?
Hi Franco. Thanks for your kind words. Your proposed topology should work, but there might be potential issues depending on the switch model (see https://www.tp-link.com/us/support/faq/1794/ ) .
If possible I’d suggest not having a switch between the Deco units. The Deco S7 units have 3 Ethernet ports, so you might be able to avoid the need for a switch.
Thanks a lot Tim. I will try the third wired solution shown in the tp-link support explanation consisting in a switch connected to the main deco.
You dont mention the subscription you have to pay
I don’t pay for any TP-Link subscriptions. On some of their mesh unit TP-Link offer “Home Shield Pro” for enhanced security, but as far as I’m aware its totally optional.
Thank you for this information, really helpful.
Is each TP-Link separate wifi networks, and will our devices connect automatically?
The TP-Link mesh units will provide a unified WiFi network, allowing seamless device mobility between units. However, a potential challenge arises when devices struggle to transition smoothly between the WiFi signals of the Starlink router and your TP-Link mesh network.
To fix this, one solution is to activate “bypass mode” on the Starlink router, which disables its WiFi. This can be done through the Starlink app (applicable for Gen2 or Gen3 dishes). Allow a few minutes for the changes to take effect, and consider rebooting your devices if necessary.